
Home Assistant is a powerful home automation platform that allows you to control devices such as your lights, thermostat, security system, and more. Home Assistant stores all of its data about your devices, entities, automations, and events in a database that, over time, can grow to be quite large and affect the performance of your system.
The information in the database is used to power various features of Home Assistant, such as the history, logbook, and statistics, but the default configuration might be collecting a lot of data that is not useful to you, and is wasting your computer resources, degrading system performance, and contributing to an earlier failure of your hardware by excessively writing data to the database.
This guide will provide some tips to improve performance of your Home Assistant database, starting with some general tips, and then taking a deep dive into reducing the database size and amount of writing to the database.
General Tips
Here are some tips for optimizing the performance of your Home Assistant database:
- Use a fast storage medium. The Home Assistant database will be accessed frequently, so it is important to use a fast storage medium, such as an SSD.
- Set the commit_interval to a higher value. The commit_interval determines how often Home Assistant writes data to the database. By setting the commit_interval to a higher value, you can reduce the number of writes to the database, which can improve performance.
Reduce Database Size and Writing
The Home Assistant database is a critical part of the platform. It is responsible for storing all of the data that powers Home Assistant’s features. A lot of the data being stored may not be of use to you. By limiting the amount of data that is stored in the database, you can improve your system performance and reduce the amount of storage space that is required.
Reducing the amount of data written to the database can also benefit installations on an SSD or SD flash memory card, which have a finite number of writes before the device fails.
You can control what gets written to and read from the database by configuring the Recorder, Logbook, and History integrations. You can configure Recorder to exclude or include entire domains (e.g. light, sensor, switch) or individual entities (e.g. light.bedroom, sensor.kitchen_motion, switch.office_lamp). You can also configure which entities are read from the database when selecting the Logbook or History sidebars.
First, you’ll need to analyze the data that is being stored under the current Home Assistant configuration to determine which domains and entities you’ll want to exclude and include.
Analyze Current Data
There’s basically two ways to get your current data for analysis. You can either (a) use a template in Developer Tools to simply list all of your entities or (b) run a query of the SQL database with a list of your entities sorted by the number of events recorded in the database.
Template Method
Go to tab Developer Tools > Template, and enter in the following template:
{% for state in states %}
  - {{ state.entity_id -}}
{% endfor %}
The template will simply list all of your entities.
SQL Query Method
The SQLite Web add-on from the Home Assistant Add-on Store can be used to access the SQL database and run queries.
To install the SQLite Web add-on, navigate to the Settings > Add-ons panel in your Home Assistant frontend, and click on the “Add-on store” tab in the bottom right corner of your screen. Search for the SQLite Web add-on and then install it.
After the SQLite Web add-on has been installed, you can access your SQL database by clicking on the link to the SQLite Web add-on in the sidebar of your Home Assistant frontend.
In the SQLite Web add-on, click on “states” in the left sidebar to access the states table of your Home Assistant database.

Click on “Query”, enter the below query for the states table, click on “Execute” to view the results, and then click on “Export CSV” to download the CSV file containing the query results.

Use the following SQL query for the states table:
SELECT
states_meta.entity_id,
COUNT(*) AS cnt
FROM states JOIN states_meta
ON states.metadata_id = states_meta.metadata_id
GROUP BY
states_meta.entity_id
ORDER BY
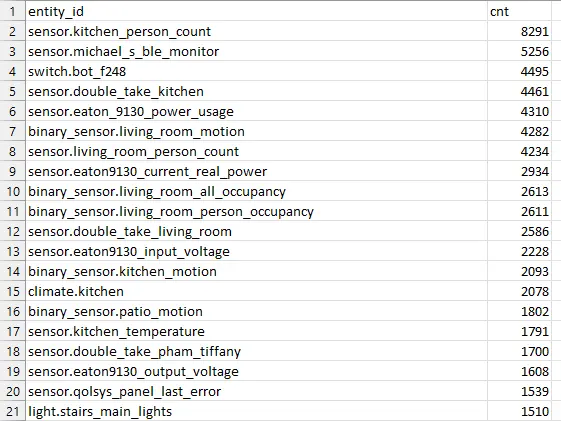
COUNT(*) DESC;Open the downloaded CSV file to see a list of entities sorted by the number of entries in the the table of your Home Assistant database. You can use this information to determine which entities or domains you want to exclude from Recorder, Logbook, or History. Here’s an example of the data from my CSV file:
Note: The below query for the events table is no longer working due to changes to the structure of the table in the current version of Home Assistant. Until the events query is fixed, you can just use the information from the states table to determine which entities to exclude and include.
Do the same for the events table using the below query:
SELECT
    JSON_EXTRACT:(event_data, '$.entity_id') AS entity_id,
    COUNT(*) AS cnt
FROM events
WHERE
    JSON_EXTRACT:(event_data, '$.entity_id') IS NOT NULL
GROUP BY
    JSON_EXTRACT:(event_data, '$.entity_id')
ORDER BY
    COUNT(*) DESC;
Configure Recorder
Now that you know which entities and domains to exclude and include, you can make the applicable changes to the configuration for Recorder.
Open your configuration.yaml file and add your configuration for Recorder with filters to exclude or include your entities. You can use the the Studio Code Server from the Home Assistant Add-on Store to make your changes to the configuration.yaml file.
For each filter, you can use the domains or entities category for filtering. You can easily copy and paste the names of the entities and domains from the list you got in the previous step.
Pro Tip: You can use an asterisk * as a glob for the name of entities or domains.
Here’s an example of my configuration:
recorder:
  include:
    domains:
      - sensor
      - binary_sensor
      - switch
      - light
      - cover
      - climate
      - media_player
    entities:
      - weather.home
  exclude:
    domains:
      - sun
      - weather
    entities:
      - sensor.last_boot
      - sensor.date
      - sensor.eaton9130_battery_charge
      - sensor.eaton9130_battery_runtime
      - sensor.eaton9130_load
      - sensor.eaton9130_output_voltage
      - sensor.eaton9130_current_real_power
    entity_globs:
      - switch.adaptive_lighting*
      - sensor.pi_hole*
      - sensor.zone*
      - binary_sensor.zone*
      - sensor.*_all_count
      - sensor.*beacon_monitor*
You’ll probably never look at the Logbook or History for a lot of your entities, so they are just taking up space and reducing the write endurance of your SSD or SD card.
Some domains that you’ll likely want to exclude are:
scriptzoneautomation
Some entities that you’ll likely want to exclude are:
sensor.timesensor.*battery*binary_sensor.*battery*sensor.*storage*
If you want to display the entity in Logbook or History, or as a graph in the frontend (including the “more info” pop-ups), the entity must be included in Recorder.
If you want to include most of the entities under a certain domain and only exclude a few entities under such domain, you can list those entities under the exclude option of Recorder (you won’t need to list any domains under the include option). For example, if I want Recorder to include most of my automation entities but exclude only a few such entities, I could use the following configuration to only exclude some of those entities:
exclude:
  entities:
  - automation.kitchen_camera_motion
  - automation.office_camera_motion
  - automation.patio_camera_motion
If you have a large number of entities under a certain domain that you want to exclude, you can list all such domains under the exclude option for Recorder and list the applicable entities under the include option. For example, if I want to exclude most of the entities under certain domains, I could use the following configuration to exclude the domains and include only certain entities of such domains:
exclude:
  domains:
  - camera
  - light
  - remote
  - scene
  - sun
  - zone
  - script
  entities:
  - automation.kitchen_camera_motion
  - automation.office_camera_motion
  - automation.patio_camera_motion
include:
  entities:
  - light.bedroom_lights
  - light.kitchen_lights
  - light.office_lights
  - light.patio_lights
Refer to the documentation from the Home Assistant website for more information and a detailed explanation about the configuration of Recorder, Logbook, and History. The documentation includes an explanation of the order in which the exclude and include filters are applied.
You can also configure how long Home Assistant will keep the data by modifying the setting for purge_keep_days. The default is 10 days, but you can decrease or increase it to your liking.
Leave a Reply